

 |
| Click pattern to open in a new window and print to desired size. ©Cindy White 2011. Rose Petal pattern shared for your own personal use and inspiration only. |
If you look closely at the above red rose you see the text pretty clearly on the petals. For the blue rose I wanted a softer look so I painted a watered down cream colored acrylic paint on the pages. I used an old Macintosh Bible for the pages, way out of date, the Mac G3 that went with it, long gone extinct. Use a medium weight paper, not a flimsy bargain paperback paper but not heavily coated quality either. You should still see the text though the paint, just softer.

After the paper dries, crumble it up a couple of times and then smooth it out. This softens the paper, makes it more pliable plus adds a nice crinkly texture.

Next, choose a rubber stamp, it doesn't matter what the image is, with a combination of heavy and thin lines. (I used a SU stamp from a set called Fine Vine) Ink it and then stamp several times on your paper before inking again so you get some darker and lighter abstract impressions.

You don't actually want to make out the design, just get the color on the paper.

Then on the back of the paper (the unpainted side) trace around the petal patterns. You do not have to be really precise with this, a fast trace around is good enough. Turn the pattern in different directions so the type goes in different directions on the petals. I ended up using about 11 of the large petals and about 13 medium and 13 small for my flower. I'd make a few extra of each. For the leaves I just drew a petal shape by hand. Make the leaves bigger than you think you'll need and draw a little "fish tail" on one end of each leaf (scroll down several photos to see fish tail).

I promise it doesn't take too long to cut these out! You don't have to be really neat about it, just try to have a smooth wavy top edge on the petals, the rest doesn't matter so much. It will go faster if you separate each petal from the sheet first before cutting it out.

Once you have your petals cut out, run the top edge of each one across the ink pad, this with give each petal definition and improve the look of the finished rose.

To begin shaping each petal use something like the handle of a small paintbrush to curl. I just used the metal part of a stylus. You want to make the curl tighter than you think it should be.

Then pinch the narrow tab end with one hand and shape the petal with your other hand into a nice shape.

This next part is a little hard to explain but you need to give the tab end a little twist to flatten it down against the mat and bend the petal so it stands up.

Next the leaves. Rose leaves have a jagged edge. For the red rose I snipped into each leaf to create the edge like the leaf in the center of the below photo. For the blue rose I used my decorative scissors that cut a very small scallop. If you use these, you have to make sure you're making the cut from the right direction so you don't get the scallop going out of the leaf instead of into the leaf, if you know what I mean. However you decide to do the edge, fold the leaf in half lengthwise to ink a line down the center for the vein and ink the edges.

Then pinching the "fish tail" in one hand, shape it into a nice leaf shape with the other.

Now you're ready to assemble the flower. Cut a round base from card stock. Cut it smaller than you think it should be. See photo. The small base will help give the rose a nice shape and dimension.
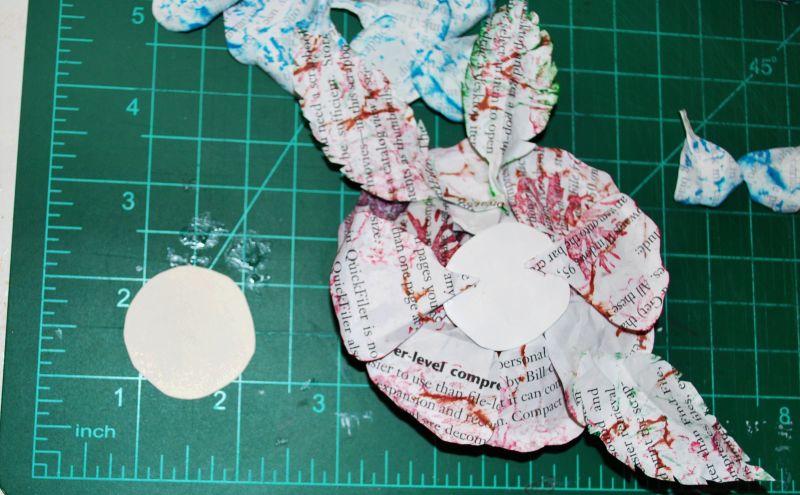
Put a thin line of glue around the outer edge of the circle, I used Aleenes's Tacky Glue . Start gluing on the larger petals, at least 8 evenly spaced. Use a stylus or something similar to firmly press down the petal tab into the glue. The petals should be standing up pretty straight at this point. As you add more petals it will naturally "bloom".

Add another circle of glue and with the medium petals work your way around the center, staggering the petals so they don't line up with the one behind them. You should end up with at least two circular rows of medium petals before you start on the small ones. After you glue in a few small petals you may have to start trimming off the tab end a little so they fit naturally inside the flower. When you get to the very center, roll a few petals together, cut off the excess tab ends and glue in. This can be a little tricky so have a few extra small petals just in case you don't like your first try. It's nice to have three leaves on your flower, two together on one side, one opposite. Just glue them on underneath the flower.
 |
| All the large and medium petals attached. |
And here are the finished roses. You can see the difference the acrylic paint made in softening the blue flower.


I really like that...and done all freehand!! Tutorial was well written and easy to understand.
ReplyDeleteJackie
WOW! These are really neat and great instructions. Thanks for sharing.
ReplyDeleteGreat tutorial and I love that you used old book pages!
ReplyDeleteThose are beautiful! Thanks for the tutorial and the pattern!
ReplyDeleteAbsolutely beautiful...so natural....so much character....WOW!!!
ReplyDeleteThank you for the instructions too!!!
Tammy